
How to Develop AI Tools on WordPress Using Gemini: Step-by-Step Guide(2024)
- Last updated on March 29, 2024
- / by
-
Waqas Munawer

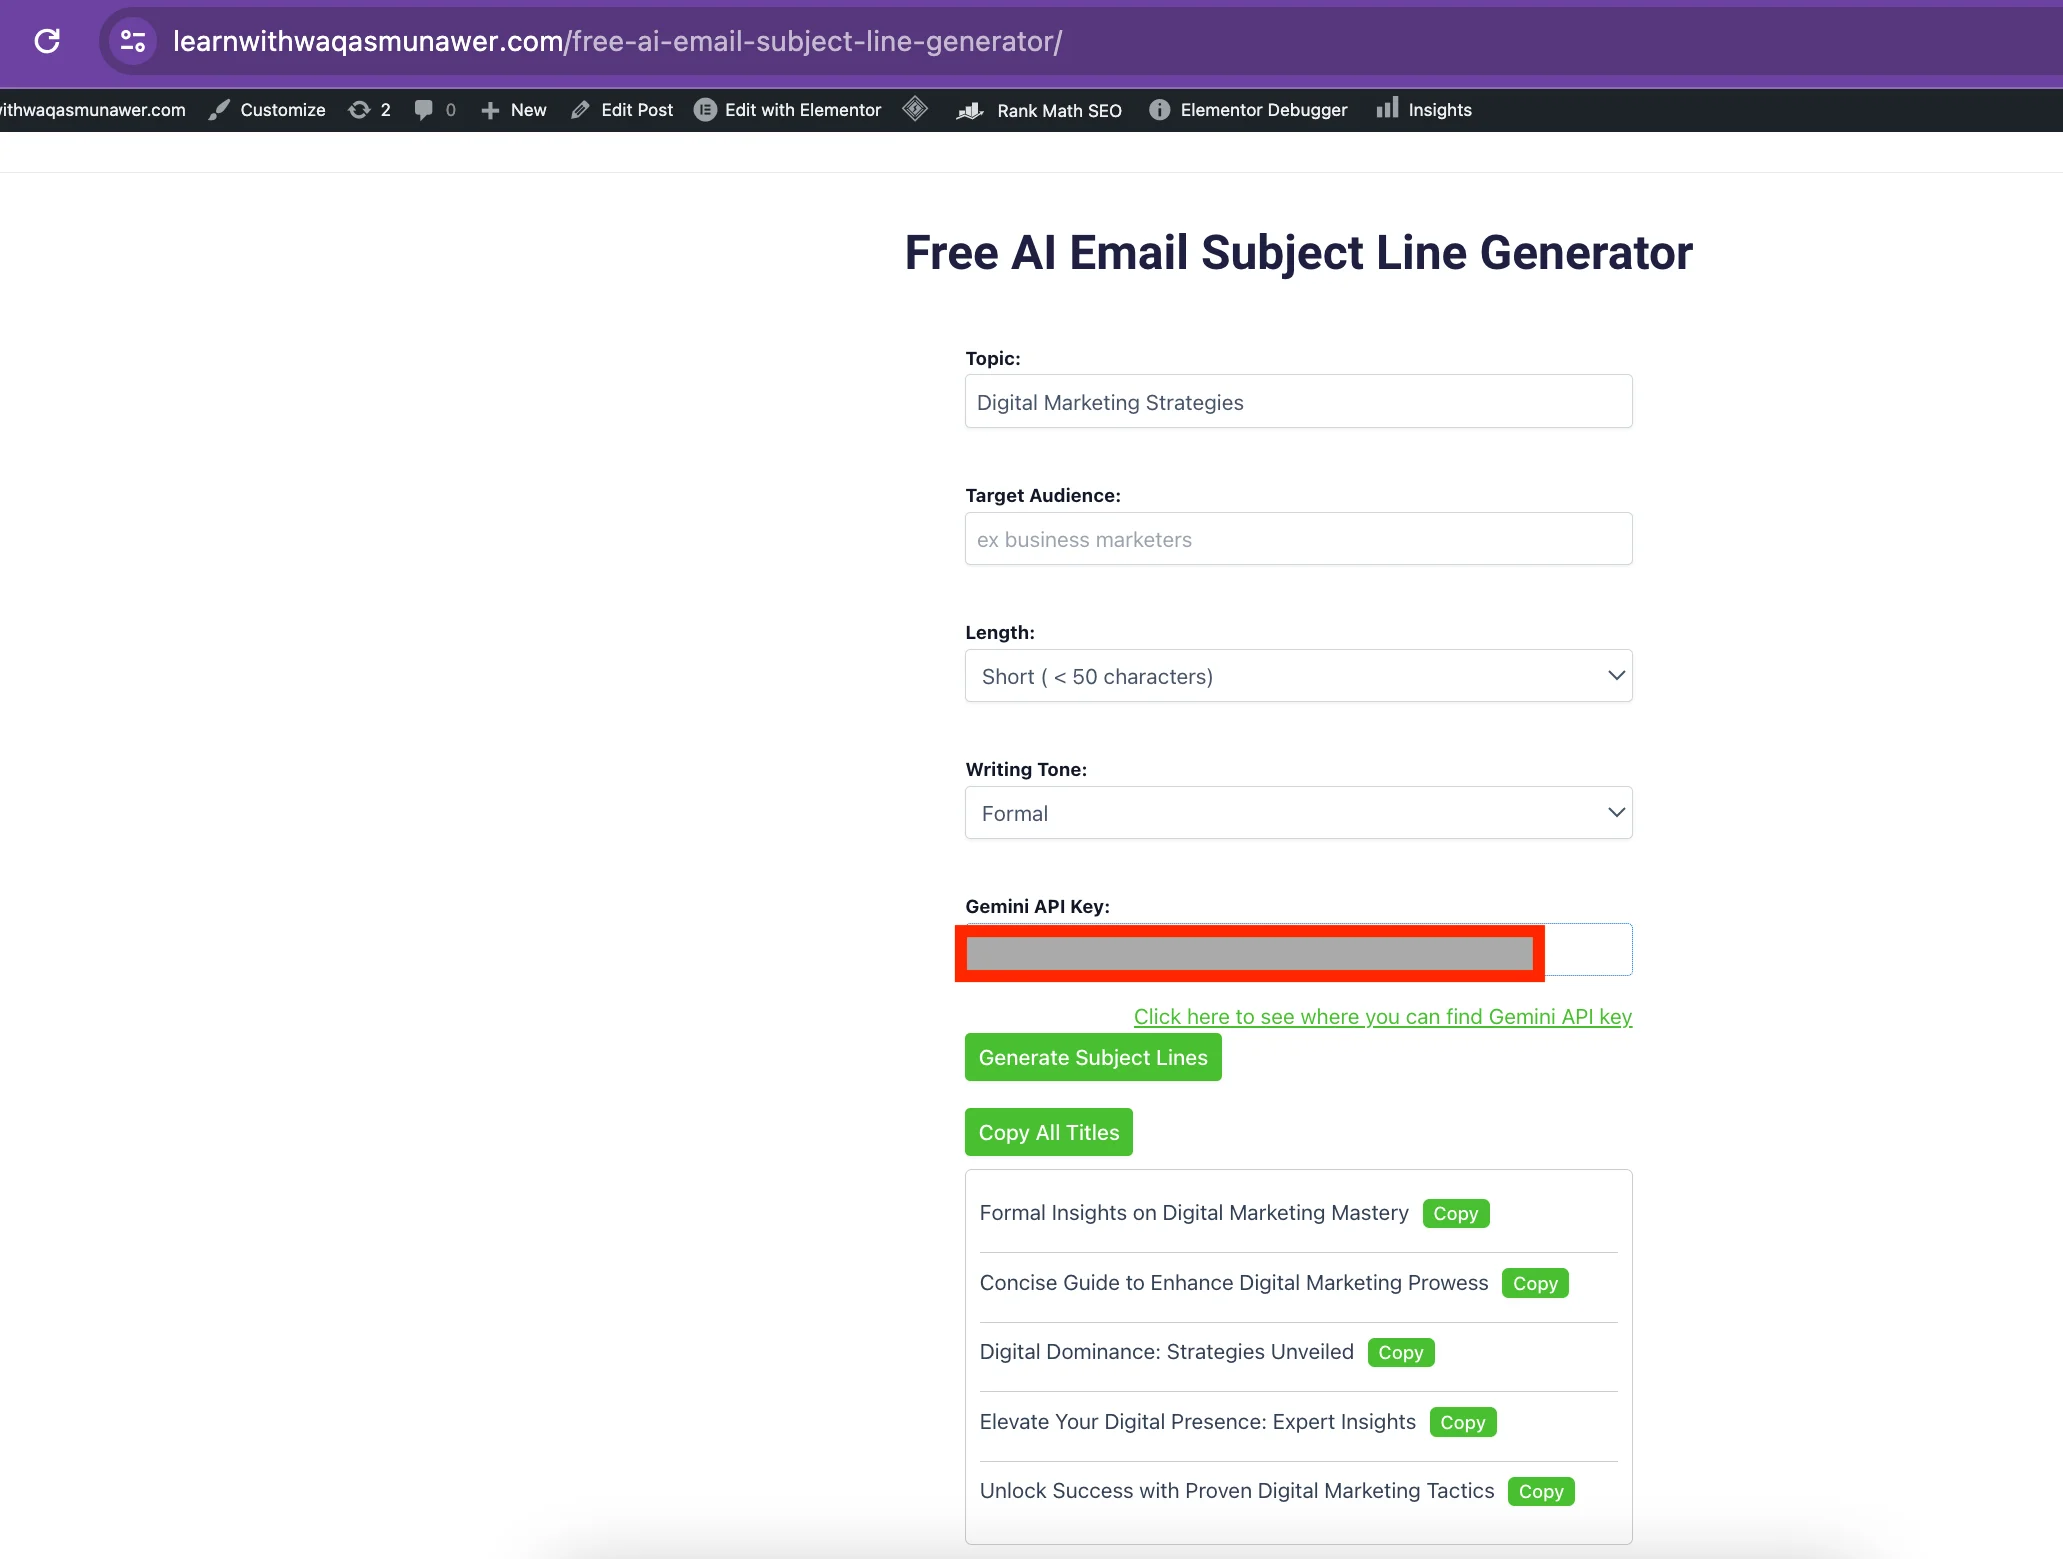
Are you ready to harness the power of AI tools on WordPress using Gemini? In this step-by-step guide, we’ll explore how to develop an AI Email Subject Line Generator, which I have developed and published on this website. You can check out this tool here.
If you’re interested in exploring another fascinating tool creation journey, check out my blog on How to Develop AI Tools on WordPress Using ChatGPT: A Step-by-Step Guide for more inspiration.
With AI-driven tools becoming increasingly accessible, now is the perfect time to leverage their capabilities to enhance your website’s functionality and user experience.
Google’s GEMINI at the forefront of AI technology, enabling developers to create innovative solutions with ease. By integrating GEMINI into your WordPress website through the Gemini API, you can unlock a world of possibilities for AI-driven tools. Let’s dive into the exciting world of AI tools and learn how to harness their power effectively!
Table of Contents
Why Create Online AI Tools on WordPress Websites?
Enhanced User Engagement
Improved Efficiency
Competitive Edge
AI Tool Components:
WordPress Page
HTML UI Design
JavaScript Function
PHP Function
Step-by-Step Guide for AI Tools on WordPress Using Gemini:
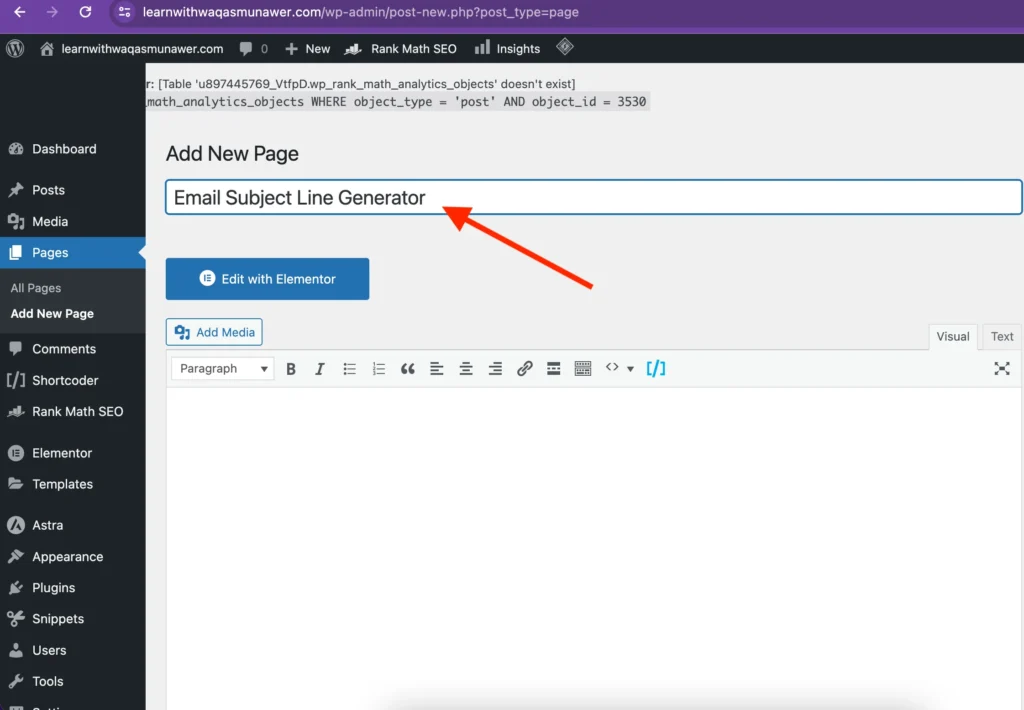
STEP 1: Create a New Page on the WordPress Dashboard
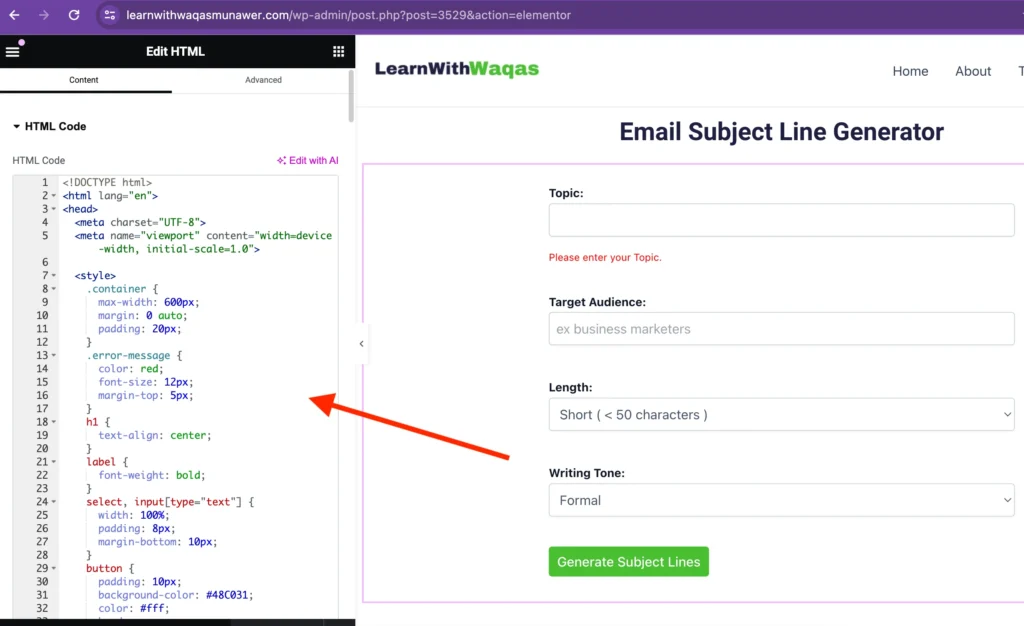
STEP 2: Generate HTML UI Design Using Gemini
Utilize the Gemini to swiftly generate the HTML UI design for your AI tool. Designing the user interface (UI) for your AI tool is an iterative process facilitated by Gemini. After generating the initial HTML code, keep in mind that you can request changes to the design.
For example, if you wish to add more functionality, such as including an extra dropdown field for selecting audience types or an additional field for entering the Gemini API key, simply ask Gemini to make the necessary adjustments. This iterative approach ensures that the UI meets your specific requirements and enhances the overall user experience.

UI Design Prompt
STEP 3: Add HTML Code to Your WordPress Page

STEP 4: Implement JavaScript Function for User Inputs
In the JavaScript code accompanying the HTML, implement a function to collect user inputs and make calls to the PHP function based on these inputs. Following is the complete HTML code including Javascript.
<!DOCTYPE html>
<html lang="en">
<head>
<meta charset="UTF-8">
<meta name="viewport" content="width=device-width, initial-scale=1.0">
<style>
.container {
max-width: 600px;
margin: 0 auto;
padding: 20px;
}
.error-message {
color: red;
font-size: 12px;
margin-top: 5px;
}
h1 {
text-align: center;
}
label {
font-weight: bold;
}
select, input[type="text"] {
width: 100%;
padding: 8px;
margin-bottom: 10px;
}
button {
padding: 10px;
background-color: #48C031;
color: #fff;
border: none;
cursor: pointer;
margin-bottom: 10px;
}
button:hover {
background-color: #0056b3;
}
.loading-spinner {
border: 6px solid #f3f3f3;
border-top: 6px solid #007bff;
border-radius: 50%;
width: 50px;
height: 50px;
animation: spin 1s linear infinite;
margin: 0 auto;
display: none;
}
@keyframes spin {
0% { transform: rotate(0deg); }
100% { transform: rotate(360deg); }
}
.copy-subject-line-button {
margin-left: 10px;
background-color: #48C031;
color: white;
border: none;
cursor: pointer;
padding: 4px 8px;
text-decoration: none;
display: inline-block;
font-size: 14px;
border-radius: 5px;
}
.copy-all-subject-lines-button {
display: none;
background-color: #48C031;
margin-top: 10px;
}
.copy-all-subject-lines-button.show {
display: block;
}
/* Updated styles for the list view */
#subjectLinesResults {
display: none; /* Hide by default */
border: 1px solid #ccc;
border-radius: 5px;
padding: 10px;
}
#subjectLinesResults.show {
display: block; /* Display when titles are fetched */
}
#subjectLinesResults ul {
list-style: none;
padding: 0;
margin: 0;
}
#subjectLinesResults ul li {
border-bottom: 1px solid #ccc;
padding: 8px 0;
}
#subjectLinesResults ul li:last-child {
border-bottom: none;
}
/* Additional styles for the link */
.link-container {
display: flex;
justify-content: flex-end;
margin-top: -10px !important; /* Reduce top margin */
}
.link-container a {
margin-top: -10px !important; /* Reduce top margin */
}
</style>
</head>
<body>
<div class="container">
<label for="topicKeyword">Topic:</label>
<input type="text" id="topicKeyword" name="topicKeyword" required>
<span id="topicKeywordError" class="error-message"></span><br><br>
<label for="targetAudience">Target Audience:</label>
<input type="text" placeholder="ex business marketers " id="targetAudience" name="targetAudience" required>
<span id="targetAudienceError" class="error-message"></span><br><br>
<label for="emailSubjectLineLength"> Length:</label>
<select id="emailSubjectLineLength" name="emailSubjectLineLength">
<option value="short">Short ( < 50 characters )</option>
<option value="medium">Medium ( 50-75 characters )</option>
<option value="long">Long ( > 75 characters )
</option>
</select><br><br>
<label for="writingTone">Writing Tone:</label>
<select id="writingTone" name="writingTone">
<option value="formal">Formal</option>
<option value="casual">Casual</option>
<option value="humorous">Humorous</option>
<option value="professional">Professional</option>
<option value="inspirational">Inspirational</option>
<option value="educational">Educational</option>
<option value="engaging">Engaging</option>
<option value="neutral">Neutral</option>
</select><br><br>
<button id="generateSubjectLinesBtn">Generate Subject Lines</button>
<button id="copyAllSubjectLinesBtn" class="copy-all-subject-lines-button">Copy All Subject Lines</button>
<div id="loadingSpinner" class="loading-spinner"></div> <!-- Loading spinner -->
<div id="subjectLinesResults">
<!-- Titles will be displayed here -->
</div>
</div>
<script>
document.getElementById('generateSubjectLinesBtn').addEventListener('click', function(event) {
event.preventDefault();
// Clear previous data
document.getElementById('subjectLinesResults').innerHTML = '';
// Hide the "Copy Subject Lines" button
document.getElementById('copyAllSubjectLinesBtn').classList.remove('show');
// Hide the results section
document.getElementById('subjectLinesResults').classList.remove('show');
const topicKeyword = document.getElementById('topicKeyword').value;
const targetAudience = document.getElementById('targetAudience').value;
const emailSubjectLineLength = document.getElementById('emailSubjectLineLength').value;
const writingTone = document.getElementById('writingTone').value;
// Inline data validation for topic keyword
if (topicKeyword === '') {
const topicKeywordError = document.getElementById('topicKeywordError');
topicKeywordError.textContent = 'Please enter your Topic.';
return;
}
// Clear any previous error message
document.getElementById('topicKeywordError').textContent = '';
document.getElementById('geminiAPIKeyError').textContent = '';
// Show loading spinner
showLoadingSpinner();
const prompt = `As an expert in creating email subject lines generators, your task is to generate [5] unique Email Subject Lines based on different input values provided by a user. The user will specify various input options for email subject lines generation, including Email Topic, Target Audience(Optional input),Email Subject Line Length (shor, medium, long), Writing Tone Selection Options (formal, casual, humorous, professional, inspirational, educational, engaging, neutral).
Ensure that the generated subject lines are not generic and have not been created numerous times before. The subject lines should be provided in JSON format, with a single key named [subjectlines] containing the generated Email Subject Lines. Again I request you please make sure you generate [5] unique email subject lines and return in json format as mentioned the JSON Sample below.
Inputs:
Here are the metrics provided in the user input:
1. Topic for the Email is ${topicKeyword}.
2. Email Subject Line length is ${emailSubjectLineLength}.
3. Target Audience(Optional Input) is ${targetAudience}.
4. Writing Tone selection is ${writingTone}.
Sample Output JSON:
{
"subjectlines": ["This is Email Subject Line 1", "This is Email Subject Line 2", "This is Email Subject Line 3", "This is Email Subject Line 4", "This is Email Subject Line 5"]
}
Note:
-Subject Line Short Length is less than 50 characters.
-Subject Line Medium Length is between 50 - 70 characters.
-Subject Line Long Length is greater than 75 characters.`;
const formData = new FormData();
formData.append('action', 'generate_response_with_gemini');
formData.append('user_prompt', prompt);
fetch('/wp-admin/admin-ajax.php', {
method: 'POST',
body: formData
})
.then(response => response.json())
.then(data => {
if (data.success) {
// Access the "subjectlines" array
const subjectLines = data.data.subjectlines;
displayEmailSubjectLines(subjectLines);
document.getElementById('copyAllSubjectLinesBtn').classList.add('show');
// Show the subjectlines section
document.getElementById('subjectLinesResults').classList.add('show');
} else {
alert('An error occurred: ' + data.data);
}
// Hide loading spinner
hideLoadingSpinner();
})
.catch(error => {
alert('An error occurred: ' + error.message);
// Hide loading spinner
hideLoadingSpinner();
});
});
document.getElementById('copyAllSubjectLinesBtn').addEventListener('click', function(event) {
event.preventDefault();
const titles = document.querySelectorAll('#subjectLinesResults ul li');
const allTitles = Array.from(titles).map(title => title.textContent).join('\n');
copyToClipboard(allTitles);
});
function displayEmailSubjectLines(subjectLines) {
const subjectLinesResultsDiv = document.getElementById('subjectLinesResults');
const ul = document.createElement('ul');
subjectLines.forEach(subjectLine => {
const li = document.createElement('li');
li.textContent = subjectLine;
// Create Copy button
const copyButton = document.createElement('button');
copyButton.textContent = 'Copy';
copyButton.className = 'copy-subject-line-button';
copyButton.addEventListener('click', function() {
copyToClipboard(subjectLine);
});
li.appendChild(copyButton); // Append Copy button to each subject line item
ul.appendChild(li);
});
subjectLinesResultsDiv.innerHTML = ''; // Clear previous subject lines
subjectLinesResultsDiv.appendChild(ul);
}
function showLoadingSpinner() {
const loadingSpinner = document.getElementById('loadingSpinner');
loadingSpinner.style.display = 'block';
}
function hideLoadingSpinner() {
const loadingSpinner = document.getElementById('loadingSpinner');
loadingSpinner.style.display = 'none';
}
function copyToClipboard(text) {
const textarea = document.createElement('textarea');
textarea.value = text;
document.body.appendChild(textarea);
textarea.select();
document.execCommand('copy');
document.body.removeChild(textarea);
alert('Copied to clipboard: ' + text);
}
</script>
</body>
</html>
STEP 5: Implement PHP Function Using Code Snippets Plugin
Install and activate the Code Snippets plugin, using the Code Snippets plugin, create a new PHP snippet named “Gemini API.” Write a PHP function to handle tool requests, obtain user prompts and inputs, make calls to the Gemini API, generate email subject lines, and return them in JSON format.

Don’t forget to set your Gemini API key. You can find the Gemini key here.
PHP Code for Gemini API Calls
					// Your Inputs
function setApiKey() {
    return " "; //Set your Gemini API key here
}

function is_assoc(array $arr) {
    if (array() === $arr) return false;
    return array_keys($arr) !== range(0, count($arr) - 1);
}

function generate_response_with_gemini() {

    $api_key = setApiKey();
    $api_url = 'https://generativelanguage.googleapis.com/v1beta/models/gemini-pro:generateContent?key=' . $api_key ;

    // Add CORS headers
         header('Access-Control-Allow-Origin: *'); // Allows all origins
         header('Access-Control-Allow-Methods: GET, POST, OPTIONS'); // Specifies the allowed methods
         header('Access-Control-Allow-Headers: Content-Type, Authorization'); // Specifies the allowed headers
        // Variables
        $prompt = $_POST['user_prompt'];

    // Headers for the Gemini API
    $headers = [
        'Content-Type' => 'application/json'
    ];

    // Body for the Gemini API
    $body = [
        'contents' => [
            [
                'parts' => [
                    ['text' => $prompt]
                ]
            ]
        ]
    ];

    // Args for the WordPress HTTP API
    $args = [
        'method' => 'POST',
        'headers' => $headers,
        'body' => json_encode($body),
        'timeout' => 120
    ];

    // Send the request
    $response = wp_remote_request($api_url, $args);

    // Extract the body from the response
    $responseBody = wp_remote_retrieve_body($response);

    // Decode the JSON response body
    $decoded = json_decode($responseBody, true);

    // Extract the text
    if (isset($decoded['candidates'][0]['content']['parts'][0]['text'])) {

        $extractedText = $decoded['candidates'][0]['content']['parts'][0]['text'];
		// Remove backslashes
		$extractedText = stripslashes($extractedText);
		error_log('extracted text is '.$extractedText);
		$jsonObject = json_decode($extractedText, true);
		error_log('extracted json is '.$jsonObject);
        wp_send_json_success(json_decode($extractedText, true));
    }
	else
	{
		wp_send_json_success(json_decode("There is an error ocurred in generating respone.Please try again!", true));
	}

// Always die in functions echoing AJAX content
    wp_die();
}
add_action('wp_ajax_generate_response_with_gemini', 'generate_response_with_gemini');
add_action('wp_ajax_nopriv_generate_response_with_gemini', 'generate_response_with_gemini');
Frequently Asked Questions:
Yes, you can customize the design of the UI by modifying the HTML code generated by Gemini and adjusting the CSS styles to suit your preferences.
Is any coding experience required to implement AI tools on WordPress? While basic knowledge of HTML, CSS, JavaScript, and PHP is beneficial, you can follow this guide step-by-step, even as a beginner-level WordPress developer or enthusiast, to create AI tools with ease.
Are there any limitations to the number of AI tools I can create on my WordPress website?
No, there are no inherent limitations. You can create multiple AI tools on your WordPress website, each serving different purposes and catering to diverse audience needs.
How frequently should I update the AI models powering my tools?
It’s advisable to stay updated with the latest advancements in AI technology and periodically update the models powering your tools to ensure optimal performance and accuracy.
What i do not understood is in truth how you are not actually a lot more smartly-liked than you may be now. You are very intelligent. You realize therefore significantly in the case of this topic, produced me individually imagine it from numerous numerous angles. Its like men and women don’t seem to be fascinated until it is one thing to do with Woman gaga! Your own stuffs nice. All the time care for it up!
Thank you so much for your kind words! I’m glad to hear that you found my perspective valuable. Your encouragement means a lot to me, and I’ll definitely keep working hard on my content. Thanks again for your support!
et et placeat ut eum reprehenderit ducimus. dolore beatae quas est sunt. veniam et nostrum rerum nobis ut accusamus a provident quia debitis aut enim qui earum excepturi fugiat laboriosam facere.
Thank you for your comment! It seems like there might have been a mistake in your message. Did you intend to leave a specific comment or did you encounter any issues? Let me know if there’s anything I can assist you with!
awesome